AP FIT mode switch to FAT mode Configuration Example (bootrom)
- 0 Followed
- 0Collected ,5184Browsed

Network Topology
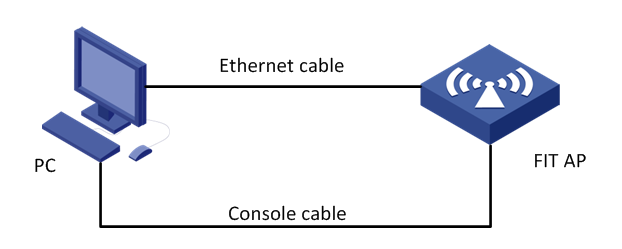
This case applies to APs of the WA5300 and WA5600 series.
Configuration Steps
Operational risk reminder: AP FIT mode switch to FAT mode is risky, improper operation or accidental power failure will cause equipment
failure, and operation needs to be cautious. The command line upgrade requires a TFTP server on the PC (3CDaemon is recommended for users to set up a TFTP server)
Download the software version into the device flash, load the host software version, and the file name entered during loading must be
consistent. It is recommended to copy and paste, and then avoid power off and reboot during the upgrade process.
1) First download the fat version of WA5300 from the official website, download the compressed package WA5300-CMW710-R2417P01- FAT.zip, decompressing it to generate an ipe file. After downloading it to the computer, you need to modify the file name to
wa5300-fat.ipe. Please note that the file name is modified correctly and put it on your computer desktop.
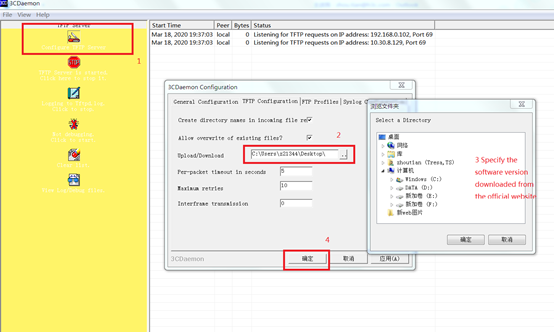
2) The computer is connected to a network port of the AP through a network cable. The address of the computer"s network card is set to: 192.168.0.1/255.255.255.0. Open the TFTP server as shown in the figure below, put the ipe software version on the computer desktop,
point the TFTP server directory to the computer desktop, and click OK.
3) Reboot the AP, when "Press Ctrl + B
to access EXTENDED-BOOTWARE MENU ..." appears, press
main menu:
==========================
|<1> Boot System |
|<2> Enter Serial SubMenu |
|<3> Enter Ethernet SubMenu |
|<4> File Control |
|<5> Restore to Factory Default Configuration |
|<6> Skip Current System Configuration |
|<7> BootWare Operation Menu |
|<8> Skip Authentication for Console Login |
|<9> Storage Device Operation |
|<0> Reboot |
===================================================================
Ctrl+Z: Access EXTENDED ASSISTANT MENU
Ctrl+F: Format File System
Ctrl+C: Display Copyright
Ctrl+Y: Change AP Mode
Enter your choice(0-9): Ctrl+F // Press Ctrl+F to Format flash
Warning:All files on flash will be lost! Are you sure to format? [Y/N]Y //input Y
...........................................................................................................................
Format success.
==========================
|<1> Boot System |
|<2> Enter Serial SubMenu |
|<3> Enter Ethernet SubMenu |
|<4> File Control |
|<5> Restore to Factory Default Configuration |
|<6> Skip Current System Configuration |
|<7> BootWare Operation Menu |
|<8> Skip Authentication for Console Login |
|<9> Storage Device Operation |
|<0> Reboot |
===================================================================
Ctrl+Z: Access EXTENDED ASSISTANT MENU
Ctrl+F: Format File System
Ctrl+C: Display Copyright
Ctrl+Y: Change AP Mode
Enter your choice(0-9): Ctrl + Y // Press Ctrl+Y to set ap fat mode or fit mode
Please select the new mode
Current mode is Fit
============================================================================
|NO. Mode |
|1 Fat Mode |
|2 Fit Mode |
|0 Exit |
============================================================================
Enter your choice(0-2):1 //Enter <1> in the AP mode switch menu to switch the working mode of the AP to FAT mode.
Changed to fat mode successfully!
4) Enter the Modify Ethernet Parameters menu and use the TFTP network protocol to transmit wa5300-fat.ipe to the AP
==========================
|<1> Boot System |
|<2> Enter Serial SubMenu |
|<3> Enter Ethernet SubMenu |
|<4> File Control |
|<5> Restore to Factory Default Configuration |
|<6> Skip Current System Configuration |
|<7> BootWare Operation Menu |
|<8> Skip Authentication for Console Login |
|<9> Storage Device Operation |
|<0> Reboot |
===================================================================
Ctrl+Z: Access EXTENDED ASSISTANT MENU
Ctrl+F: Format File System
Ctrl+C: Display Copyright
Ctrl+Y: Change AP Mode
Enter your choice(0-9): 3
==========================
|Note:the operating device is flash |
|<1> Download Image Program To SDRAM And Run |
|<2> Update Main Image File |
|<3> Update Backup Image File |
|<4> Download Files(*.*) |
|<5> Modify Ethernet Parameter |
|<0> Exit To Main Menu |
|
============================================================================
Enter your choice(0-5):5
===========
|Note: "." = Clear field.
| "-" = Go to previous field.
| Ctrl+D = Quit.
===============================================================
Protocol (FTP or TFTP) : ftp TFTP
// Ignore the output, enter TFTP directly, and then press Enter
Load File Name : wa5300-fat.ipe
// Ignore the output, enter wa5300-fat.ipe directly, and then press Enter
Target File Name : wa5300-fat.ipe
// Ignore the output, enter wa5300-fat.ipe directly, and then press Enter
Server IP Address :192.168.0.1
// Ignore the output, directly enter the IP of the computer host, such as 192.168.0.1, and then press Enter
Local IP Address :192.168.0.50
// Ignore the output, directly enter the same network segment as the host computer"s ip, such as 192.168.0.50, and then press Enter
Gateway IP Address :0.0.0.0
// Ignore the output and press Enter
Note that the computer must be manually configured with an IP address on the same network segment as the AP to ensure that the
computer and the AP are reachable.
=============
|Note:the operating device is flash
|<1> Download Application Program To SDRAM And
|<2> Update Main Application File
|<3> Update Backup Application File
|<4> Update Secure Application File
|<5> Modify Ethernet Parameter
|<0> Exit To Main Menu
|
=============================================================
Enter your choice(0-5): 2 // At this point you can see the scroll of data upload on the TFTP server
Loading.................................................................................................................Done.
38265856 bytes downloaded!
Image file wa5300-fat-boot.bin is self-decompressing...
Saving file flash:/wa5300-fat-boot.bin .................Done.
Image file wa5300-fat-system.bin is self-decompressing...
Saving file flash:/wa5300-fat-system.bin ..............................................................................................Done.
Select <0> to return to the main BootWare menu:
Enter your choice (0-5): 0
5) Return to the main menu and reboot the device
==========================
|<1> Boot System |
|<2> Enter Serial SubMenu |
|<3> Enter Ethernet SubMenu |
|<4> File Control |
|<5> Restore to Factory Default Configuration |
|<6> Skip Current System Configuration |
|<7> BootWare Operation Menu |
|<8> Skip Authentication for Console Login |
|<9> Storage Device Operation |
|<0> Reboot |
===================================================================
Ctrl+Z: Access EXTENDED ASSISTANT MENU
Ctrl+F: Format File System
Ctrl+C: Display Copyright
Ctrl+Y: Change AP Mode
Enter your choice(0-9): 0
System is starting...
Press ENTER to get started.
6) After reboot the device, you can use the default management address 192.168.0.50 to log in to the AP for management. The default
user name for logging in to the AP is admin and the password is h3capadmin.
Key Configuration
Ctrl + F to format flash, then Ctrl + Y to select fat mode, and finally load the fat version.