★ Using NETCONF to issue security policies for firewalls (implemented in Python ncclient module)
- 0 Followed
- 0Collected ,2704Browsed

Network Topology
Device: Firewall
Model: F1070
Software version: D022 and above
Problem Description
Description:
·
·
This case uses the above mentioned tools and components to issue a security policy for the firewall: Block source address 1.1.1.1.
Attachment:
H3C Netconf configuration-related guidance
·
·
Process Analysis
1.

¡ Using PIP:
# Run the pip install ncclient command at the CLI.
This method will automatically install dependency packages required by ncclient. You do not need to manually download and install the dependency packages or troubleshoot installation errors.
¡ Using the source codes:
# Download the software package file from https://pypi.org/project/ncclient/.
# Decompress the package file.
# Run the python setup.py install command at the CLI.
This method requires you to install multiple dependency packages manually.
2.
1)
2)
3)
4)
3.
·
·
Solution
Configuration script
#! /usr/bin/env python3.8
import sys, os, warnings
warnings.simplefilter("ignore", DeprecationWarning)
from ncclient import manager
xml1 = """
<config
xmlns="urn:ietf:params:xml:ns:netconf:base:1.0"
xmlns:xc="urn:ietf:params:xml:ns:netconf:base:1.0">
<top
xmlns="http://www.h3c.com/netconf/config:1.0" xc:operation="create">
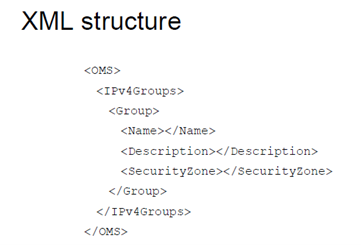
<OMS>
<IPv4Groups>
<Group>
<Name>block-ip</Name>
<Description>for_block</Description>
<SecurityZone>Trust</SecurityZone>
</Group>
</IPv4Groups>
</OMS>
</top>
</config>
"""
xml2 = """
<config
xmlns="urn:ietf:params:xml:ns:netconf:base:1.0"
xmlns:xc="urn:ietf:params:xml:ns:netconf:base:1.0">
<top
xmlns="http://www.h3c.com/netconf/config:1.0" xc:operation="create">
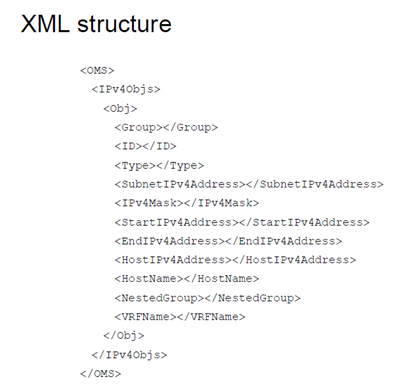
<OMS>
<IPv4Objs>
<Obj>
<Group>block-ip</Group>
<ID>0</ID>
<Type>3</Type>
<HostIPv4Address>1.1.1.1</HostIPv4Address>
</Obj>
</IPv4Objs>
</OMS>
</top>
</config>
"""
xml3 = """
<config
xmlns="urn:ietf:params:xml:ns:netconf:base:1.0"
xmlns:xc="urn:ietf:params:xml:ns:netconf:base:1.0">
<top
xmlns="http://www.h3c.com/netconf/config:1.0" xc:operation="create">
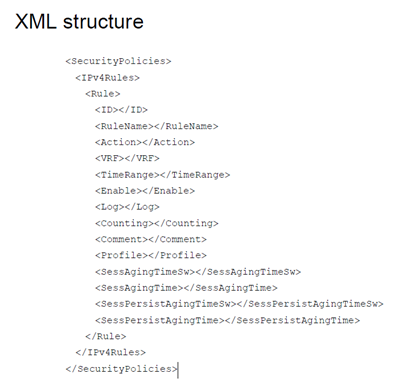
<SecurityPolicies>
<IPv4Rules>
<Rule>
<ID>1000</ID>
<RuleName>block</RuleName>
<Action>1</Action>
</Rule>
</IPv4Rules>
</SecurityPolicies>
</top>
</config>
"""
xml4 = """
<config
xmlns="urn:ietf:params:xml:ns:netconf:base:1.0"
xmlns:xc="urn:ietf:params:xml:ns:netconf:base:1.0">
<top
xmlns="http://www.h3c.com/netconf/config:1.0" xc:operation="create">
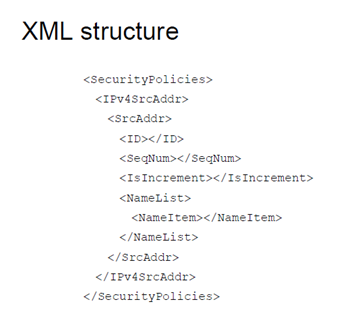
<SecurityPolicies>
<IPv4SrcAddr>
<SrcAddr>
<ID>1000</ID>
<SeqNum></SeqNum>
<IsIncrement>false</IsIncrement>
<NameList>
<NameItem>block-ip</NameItem>
</NameList>
</SrcAddr>
</IPv4SrcAddr>
</SecurityPolicies>
</top>
</config>
"""
with manager.connect(
host="192.168.1.13",
port=830,
username="admin",
password="Admin@h3c!",
hostkey_verify=False,
device_params={"name":"h3c"},
timeout=300
) as m:
for xml in [xml1, xml2, xml3, xml4]:
print (m.edit_config(target="running", cOnfig=xml))