
Network Topology
UIS normal networking environment
Problem Description
When the server adds new hardware disks, how can the operating system installed in the server recognize the new disks and write data on them?
Process Analysis
1. Find new logical volume
2.
3.
4. Mount
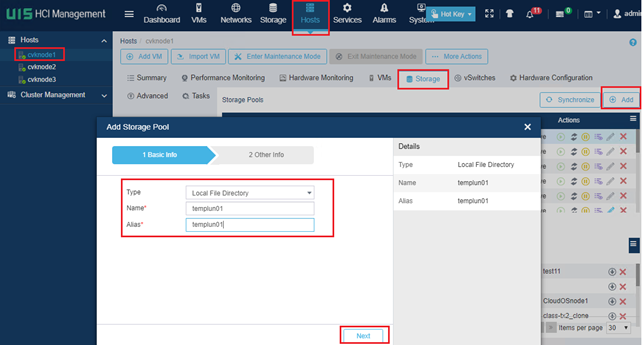
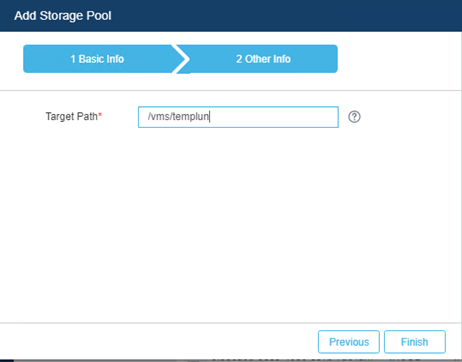
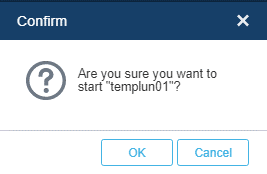
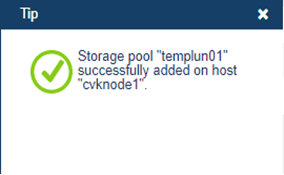
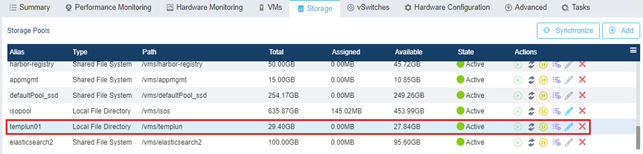
5. Add Storage Pool
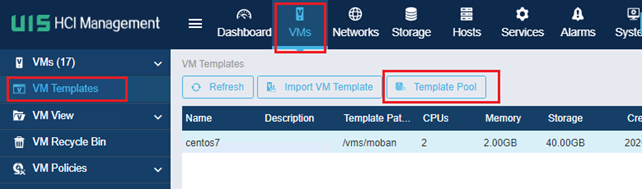
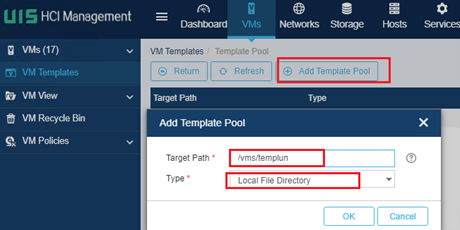
6. Add Template Pool(use another new lun,not the sameas Step5)
7. Permanently mounted hard drive
Solution
1. Find new logical volume
Logical volume /dev/sda divided into 4 partitions, sdaa,sdab,sdac,sdad.
Logical volume /dev/sdad : Device Boot is empty.
[root@cvknode1 ~]# fdisk -l
Disk /dev/sda: 900.2 GB, 900151926784 bytes, 1758109232 sectors
Units = sectors of 1 * 512 = 512 bytes
Sector size (logical/physical): 512 bytes / 512 bytes
I/O size (minimum/optimal): 262144 bytes / 262144 bytes
Disk label type: gpt
Disk identifier: D470558E-A734-4375-A65A-18B17479D1FB
# Start End Size Type Name
1 2048 411647 200M EFI System EFI System Partition
2 411648 252069887 120G Microsoft basic
3 252069888 335955967 40G Microsoft basic
4 335955968 403064831 32G Linux swap
5 403064832 1758107647 646.1G Microsoft basic
WARNING: fdisk GPT support is currently new, and therefore in an experimental phase. Use at your own discretion.]#
Disk /dev/sdad: 107.4 GB, 107374182400 bytes, 209715200 sectors
Units = sectors of 1 * 512 = 512 bytes
Sector size (logical/physical): 512 bytes / 512 bytes
I/O size (minimum/optimal): 512 bytes / 512 bytes
Disk label type: dos
Disk identifier: 0x8566ae4e
Device Boot Start End Blocks Id System
[root@cvknode1 ~]#
2.
(1) start Partition
[root@cvknode1 ~]# fdisk /dev/sdad
Welcome to fdisk (util-linux 2.23.2).
Changes will remain in memory only, until you decide to write them.
Be careful before using the write command.
Command (m for help):
(2) ViewPartition Help
Command (m for help): m
Command action
a toggle a bootable flag
b edit bsd disklabel
c toggle the dos compatibility flag
d delete a partition
g create a new empty GPT partition table
G create an IRIX (SGI) partition table
l list known partition types
m print this menu
n add a new partition
o create a new empty DOS partition table
p print the partition table
q quit without saving changes
s create a new empty Sun disklabel
t change a partition's system id
u change display/entry units
v verify the partition table
w write table to disk and exit
x extra functionality (experts only)
Command (m for help):
(3) Add new partitions
First patition
Command (m for help): n
Partition type:
p primary (0 primary, 0 extended, 4 free)
e extended
Select (default p): p
Partition number (1-4, default 1): 1
First sector (2048-209715199, default 2048): 2048
Last sector, +sectors or +size{K,M,G} (2048-209715199, default 209715199): +30G
Partition 1 of type Linux and of size 30 GiB is set
Command (m for help): p
Disk /dev/sdad: 107.4 GB, 107374182400 bytes, 209715200 sectors
Units = sectors of 1 * 512 = 512 bytes
Sector size (logical/physical): 512 bytes / 512 bytes
I/O size (minimum/optimal): 512 bytes / 512 bytes
Disk label type: dos
Disk identifier: 0x8566ae4e
Device Boot Start End Blocks Id System
/dev/sdad1 2048 62916607 31457280 83 Linux
Second patition:
Command (m for help): n
Partition type:
p primary (1 primary, 0 extended, 3 free)
e extended
Select (default p): p
Partition number (2-4, default 2): 2
First sector (62916608-209715199, default 62916608):
Using default value 62916608
Last sector, +sectors or +size{K,M,G} (62916608-209715199, default 209715199):
Using default value 209715199
Partition 2 of type Linux and of size 70 GiB is set
Command (m for help): p
Disk /dev/sdad: 107.4 GB, 107374182400 bytes, 209715200 sectors
Units = sectors of 1 * 512 = 512 bytes
Sector size (logical/physical): 512 bytes / 512 bytes
I/O size (minimum/optimal): 512 bytes / 512 bytes
Disk label type: dos
Disk identifier: 0x8566ae4e
Device Boot Start End Blocks Id System
/dev/sdad1 2048 62916607 31457280 83 Linux
/dev/sdad2 62916608 209715199 73399296 83 Linux
(4) write table to disk and exit
Command (m for help): w
The partition table has been altered!
Calling ioctl() to re-read partition table.
Syncing disks.
[root@cvknode1 ~]#
(5) confirm disk partitions
[root@cvknode1 ~]# fdisk -l | grep sdad
Disk /dev/sdad: 107.4 GB, 107374182400 bytes, 209715200 sectors
/dev/sdad1 2048 62916607 31457280 83 Linux
/dev/sdad2 62916608 209715199 73399296 83 Linux
[root@cvknode1 ~]#
3.
[root@cvknode1 ~]# mkfs.ext4 /dev/sdad1
mke2fs 1.42.9 (28-Dec-2013)
Discarding device blocks: done
Filesystem label=
OS type: Linux
Block size=4096 (log=2)
Fragment size=4096 (log=2)
Stride=0 blocks, Stripe width=0 blocks
1966080 inodes, 7864320 blocks
393216 blocks (5.00%) reserved for the super user
First data block=0
Maximum filesystem blocks=2155872256
240 block groups
32768 blocks per group, 32768 fragments per group
8192 inodes per group
Superblock backups stored on blocks:
32768, 98304, 163840, 229376, 294912, 819200, 884736, 1605632, 2654208,
4096000
Allocating group tables: done
Writing inode tables: done
Creating journal (32768 blocks): done
Writing superblocks and filesystem accounting information: done
[root@cvknode1 ~]#
4. Mount
Execute mkdir /vms/templun command in a new directory as the new hard disk mount point.
[root@cvknode1 ~]# mkdir /vms/templun
[root@cvknode1 ~]# cd /vms
[root@cvknode1 vms]# ll
total 1676
drwxr-xr-x 2 root root 4096 Feb 28 00:05 cvmbackuptmp
drwxr-xr-x 5 root root 3896 Feb 28 12:53 defaultPool_ssd
drwxr-xr-x 3 root root 4096 Jan 21 09:52 images
drwxr-xr-x 4 root root 4096 Oct 26 05:04 isos
drwx------. 2 root root 16384 Oct 26 04:32 lost+found
drwxr-xr-x 2 root root 4096 Feb 28 12:53 templun
drwxr-xr-x 2 root root 4096 Dec 19 10:28 vmbackuptmp
[root@cvknode1 /]# mount /dev/sdad1 /vms/templun
[root@cvknode1 /]#
[root@cvknode1 /]# df -TH
Filesystem Type Size Used Avail Use% Mounted on
devtmpfs devtmpfs 68G 0 68G 0% /dev
tmpfs tmpfs 68G 164k 68G 1% /dev/shm
tmpfs tmpfs 68G 4.4G 64G 7% /run
tmpfs tmpfs 68G 0 68G 0% /sys/fs/cgroup
/dev/sda2 ext4 127G 20G 102G 16% /
/dev/sda1 vfat 210M 11M 200M 5% /boot/efi
/dev/sda3 ext4 43G 7.6G 33G 19% /var/log
/dev/sda5 ext4 683G 161G 488G 25% /vms
/dev/sdad1 ext4 32G 47M 30G 1% /vms/templun
[root@cvknode1 /]#
5. Add Storage Pool
6. Add Template Pool(use another new lun,not the sameas Step5)
7. Permanently mounted hard drive
With the above operation to mount the hard drive,we still need to congfigue Step1 to Step 6 after server’s restart as this configuration will be lost after the restart. This only to be a temporary mount operation. If you want to permanently mount the hard drive, the fstab file needs to configured.
(1) Get disk’s uuid by command blkid /dev/sdad1 .
[root@cvknode1 ~]/# blkid /dev/sdad1
/dev/sdb: UU TYPE="ext4
(2) configure /etc/fstab
· Entering vi / etc / fstab,
· Type G to get to the file’s last row
· Type "i"to start edit the file
· Enter UUID(You can copy uuid above by the ssh tool), the disk’s mount point such as /vms/templun,Types of ext4, Options of "defaults", dump of 0, pass option of 2.
· Press the ESC key and then type ": wq" to save and exit.
· Entering cat /etc/fstab to confirm the configuration
[root@cvknode1 ~]/# vi /etc/fstab
# /etc/fstab: static file system information.
#
# Use 'blkid' to print the universally unique identifier for a
# device; this may be used with UUID= as a more robust way to name devices
# that works even if disks are added and removed. See fstab(5).
#
# <file system> <mount point> <type> <options> <dump> <pass>
proc /proc proc nodev,noexec,nosuid 0 0
# / was on /dev/sda2 during installation
UUID=d7f94577-db8d-4339-aG86-dcf752G0a7Oa / ext4 errors=remount-ro 0 1
# /boot/efi was on /dev/sdal during installation
UUID=4548-0F17 /boot/efi vfat defaults 0 1
# /var/log was on /dev/sda3 during installation
UUID=e3f39eb2-9975-4dc3-b7f0-6e25e98aad8c /var/log ext4 defaults 0 2
# /vms was on /dev/sda5 during installation
UUID=06077d58-ebb7-4607-938c-09f5e9ada43e /vms ext4 defaults 0 2
# swap was on /dev/sda4 during installation
UUID=28b94350-36fa-442c-baad-lcl2605b8ed4 none swap sw 0 0
UUID=d8a248ea-3cd0-4fbc-a63c-d5f8dd39a09e /vms/templun ext4 defaults 0 2
(3) After the completion of the implementation of the mount -a command, no error is proven configured correctly.Or you can also restart the server to see whether the configuration is lost after restarting the server.

After the completion of the implementation of df -h command to view disk mount case and occupancy, sdb can see the disk has been successfully mounted to the next /vms/templun directory.