★ Examples of configuring file management using SNMP v1 and v2c
- 0 Followed
- 0Collected ,2354Browsed

Network Topology
Networking requirements
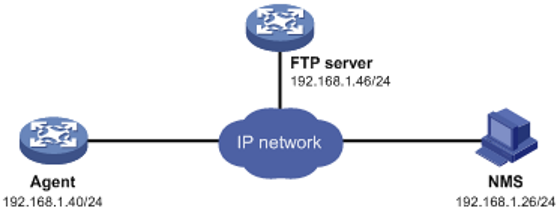
l The network management station (NMS) is connected to the devices (agents) via Ethernet.
l An FTP/TFTP server is provided for file upload and download services.
l The Net-SNMP software runs on the NMS and requires SNMPv1 and the community name "private" to manage configuration files for the agent on the NMS.
Network Diagram for Configuration File Management via SNMP
Configuration Steps
Note:
The basic configuration for SNMP v1 and v2c is similar, and this example will focus on SNMP v1. If the SNMP running on the network is version 2c, you just need to change the value of the "-v" parameter in this example to "2c".
Configuration Approach:
l Configure interface parameters on the Agent: Specify the IP address for the interface to ensure reachability between Agent and NMS routing.
l Complete basic configuration of SNMP functionality on the Agent (including SNMP version and community name) to enable mutual access between NMS and Agent.
l Check the supported MIB styles on the Agent and determine the required MIB objects to be used.
l Place the "snmpset.exe" and "snmpwalk.exe" files from the Net-SNMP software into the "C:\usr\bin" path on the NMS to perform configuration file management using MIB objects.
l If using FTP protocol for file transfer, run FTP server software on the FTP server and configure username and password. If using TFTP protocol for file transfer, run TFTP server software on the TFTP server. (When using FTP protocol, set the value of "1.3.6.1.4.1.25506.2.4.1.2.4.1.3.4" to "1" and set the username and password. When using TFTP protocol, only set the value of "1.3.6.1.4.1.25506.2.4.1.2.4.1.3.4" to "2" without setting any username and password. This example uses FTP transmission protocol).
Configure FTP server
# In this example, H3C device is used as the FTP server. Enable the FTP server functionality on the FTP server and configure FTP user (assume the username is "ftp") and password (assume the password is "123123123123") and other parameters.
<System> system-view
[System] local-user ftp
[System-luser-ftp] password simple 123123123123
[System-luser-ftp] authorization-attribute level 3
[System-luser-ftp] service-type ftp
Configuring Agent:
# Configure the IP address of the Agent as 192.168.1.40/24 and ensure routing connectivity between Agent and NMS.
l If Ethernet1/1 is a layer 3 interface, perform the following configuration:
<Sysname> system-view
[Sysname] interface ethernet 1/1
[Sysname-Ethernet1/1] ip address 192.168.1.40 24
[Sysname-Ethernet1/1] quit
l If Ethernet1/1 is a layer 2 interface, perform the following configuration:
<Sysname> system-view
[Sysname] vlan 2
[Sysname-vlan2] port Ethernet 1/1
[Sysname-vlan2] quit
[Sysname] interface vlan-interface 2
[Sysname-Vlan-interface2] ip address 192.168.1.40 24
[Sysname-Vlan-interface2] quit
#Configure SNMP version. To prevent any SNMP connection issues between the Agent and NMS due to version incompatibility, it is recommended to configure the version parameter as "all", which indicates support for SNMP v1, v2c, and v3.
<Sysname> system-view
[Sysname]snmp-agent sys-info version all
# Configure the read-only community name as "public" and the write-only community name as "private".
[Sysname] snmp-agent community read public
[Sysname] snmp-agent community write private
# Check the current supported MIB file style of the device to determine which MIB objects to use.
[Sysname] display mib-style
Current MIB style: new
Next reboot MIB style: new
The displayed information above indicates that the current supported MIB file style of the device is "new", so you can use the MIB objects with the root node as 1.3.6.1.4.1.25506. (If the Current MIB style is displayed as "compatible", then in the following configuration steps, you need to replace 1.3.6.1.4.1.25506 with 1.3.6.1.4.1.2011.10).
Configure NMS (Network Management System).
(1) Save the current running configuration to the startup configuration file (running2Startup).
C:\usr\bin> snmpset -v 1 -c private 192.168.1.40 1.3.6.1.4.1.25506.2.4.1.2.4.1.2.1 i 1 1.3.6.1.4.1.25506.2.4.1.2.4.1.9.1 i 4
The response will be:
iso.3.6.1.4.1.25506.2.4.1.2.4.1.2.1 = INTEGER: 1
iso.3.6.1.4.1.25506.2.4.1.2.4.1.9.1 = INTEGER: 4
You can verify the execution of the save operation using the snmpwalk command:
C:\usr\bin> snmpwalk -v 1 -c public 192.168.1.40 1.3.6.1.4.1.25506.2.4.1.2.5.1
The response will be:
iso.3.6.1.4.1.25506.2.4.1.2.5.1.2.1 = INTEGER: 1
iso.3.6.1.4.1.25506.2.4.1.2.5.1.3.1 = INTEGER: 1
iso.3.6.1.4.1.25506.2.4.1.2.5.1.4.1 = INTEGER: 2
iso.3.6.1.4.1.25506.2.4.1.2.5.1.5.1 = Timeticks: (245) 0:00:02.45
iso.3.6.1.4.1.25506.2.4.1.2.5.1.6.1 = Timeticks: (214998) 0:35:49.98
The above output confirms that the running2Startup operation was successful.
(2) Backup the current running configuration to an FTP server (running2Net).
To backup the current configuration to an FTP server (192.168.1.46) using the FTP protocol with the username "ftp" and password "123", and saving the file as "aa.cfg", use the following command:
C:\usr\bin> snmpset -v 1 -c private 192.168.1.40 1.3.6.1.4.1.25506.2.4.1.2.4.1.2.2 i 3 1.3.6.1.4.1.25506.2.4.1.2.4.1.3.2 i 1 1.3.6.1.4.1.25506.2.4.1.2.4.1.4.2 s aa.cfg 1.3.6.1.4.1.25506.2.4.1.2.4.1.5.2 a 192.168.1.46 1.3.6.1.4.1.25506.2.4.1.2.4.1.6.2 s ftp 1.3.6.1.4.1.25506.2.4.1.2.4.1.7.2 s 123123123123 1.3.6.1.4.1.25506.2.4.1.2.4.1.9.2 i 4
The response will be:
iso.3.6.1.4.1.25506.2.4.1.2.4.1.2.2 = INTEGER: 3
iso.3.6.1.4.1.25506.2.4.1.2.4.1.3.2 = INTEGER: 1
iso.3.6.1.4.1.25506.2.4.1.2.4.1.4.2 = STRING: "aa.cfg"
iso.3.6.1.4.1.25506.2.4.1.2.4.1.5.2 = IpAddress: 192.168.1.46
iso.3.6.1.4.1.25506.2.4.1.2.4.1.6.2 = STRING: "ftp"
iso.3.6.1.4.1.25506.2.4.1.2.4.1.7.2 = STRING: "123123123123"
iso.3.6.1.4.1.25506.2.4.1.2.4.1.9.2 = INTEGER: 4
You can use the snmpwalk command to check the execution status of the above configuration operation:
C:\usr\bin> snmpwalk -v 1 -c public 192.168.1.40 1.3.6.1.4.1.25506.2.4.1.2.5.1
The response will be:
iso.3.6.1.4.1.25506.2.4.1.2.5.1.2.1 = INTEGER: 2
iso.3.6.1.4.1.25506.2.4.1.2.5.1.3.1 = INTEGER: 3
iso.3.6.1.4.1.25506.2.4.1.2.5.1.4.1 = INTEGER: 2
iso.3.6.1.4.1.25506.2.4.1.2.5.1.5.1 = Timeticks: (243) 0:00:02.43
iso.3.6.1.4.1.25506.2.4.1.2.5.1.6.1 = Timeticks: (181608) 0:30:16.08
The above displayed information indicates that the net2Running operation was successful.
You can also use the "dir" command on the FTP server (192.168.1.46) to check if the "aa.cfg" file exists, and then use the "more aa.cfg" command to verify if the file content is correct, to validate the success of the operation.
(3) To restore the configuration file from the FTP server (192.168.1.46) to the device and execute that configuration file (net2Running), use the following command:
C:\usr\bin> snmpset -v 1 -c private 192.168.1.40 1.3.6.1.4.1.25506.2.4.1.2.4.1.2.3 i 4 1.3.6.1.4.1.25506.2.4.1.2.4.1.3.3 i 1 1.3.6.1.4.1.25506.2.4.1.2.4.1.4.3 s test.cfg 1.3.6.1.4.1.25506.2.4.1.2.4.1.5.3 a 192.168.1.46 1.3.6.1.4.1.25506.2.4.1.2.4.1.6.3 s ftp 1.3.6.1.4.1.25506.2.4.1.2.4.1.7.3 s 123123123123 1.3.6.1.4.1.25506.2.4.1.2.4.1.9.3 i 4
The response will be:
iso.3.6.1.4.1.25506.2.4.1.2.4.1.2.3 = INTEGER: 4
iso.3.6.1.4.1.25506.2.4.1.2.4.1.3.3 = INTEGER: 1
iso.3.6.1.4.1.25506.2.4.1.2.4.1.4.3 = STRING: "test.cfg"
iso.3.6.1.4.1.25506.2.4.1.2.4.1.5.3 = IpAddress: 192.168.1.46
iso.3.6.1.4.1.25506.2.4.1.2.4.1.6.3 = STRING: "ftp"
iso.3.6.1.4.1.25506.2.4.1.2.4.1.7.3 = STRING: "123123123123"
iso.3.6.1.4.1.25506.2.4.1.2.4.1.9.3 = INTEGER: 4
You can use the snmpwalk command to check the execution status of the above configuration operation:
C:\usr\bin> snmpwalk -v 1 -c public 192.168.1.40 1.3.6.1.4.1.25506.2.4.1.2.5.1
The response will be:
iso.3.6.1.4.1.25506.2.4.1.2.5.1.2.1 = INTEGER: 3
iso.3.6.1.4.1.25506.2.4.1.2.5.1.3.1 = INTEGER: 4
iso.3.6.1.4.1.25506.2.4.1.2.5.1.4.1 = INTEGER: 2
iso.3.6.1.4.1.25506.2.4.1.2.5.1.5.1 = Timeticks: (1083) 0:00:10.83
iso.3.6.1.4.1.25506.2.4.1.2.5.1.6.1 = Timeticks: (470443) 1:18:24.43
The above displayed information indicates that the net2Running operation was successful.
You can use the "display current-configuration" command on the Agent (192.168.1.40) to see the current running configuration of the Agent, which includes both the configurations from the Agent"s current startup configuration file and the "test.cfg" file.
(4) Restore the configuration file test.cfg from the FTP server to the device"s Flash memory (net2Startup).
Replace the content of the current configuration file on the Agent with the content of the test.cfg file and specify the current configuration file as the next startup configuration file.
C:\usr\bin> snmpset -v 1 -c private 192.168.1.40 1.3.6.1.4.1.25506.2.4.1.2.4.1.2.4 i 5 1.3.6.1.4.1.25506.2.4.1.2.4.1.3.4 i 1 1.3.6.1.4.1.25506.2.4.1.2.4.1.4.4 s test.cfg 1.3.6.1.4.1.25506.2.4.1.2.4.1.5.4 a 192.168.1.46 1.3.6.1.4.1.25506.2.4.1.2.4.1.6.4 s ftp 1.3.6.1.4.1.25506.2.4.1.2.4.1.7.4 s 123123123123 1.3.6.1.4.1.25506.2.4.1.2.4.1.9.4 i 4
The response will be:
iso.3.6.1.4.1.25506.2.4.1.2.4.1.2.4 = INTEGER: 5
iso.3.6.1.4.1.25506.2.4.1.2.4.1.3.4 = INTEGER: 1
iso.3.6.1.4.1.25506.2.4.1.2.4.1.4.4 = STRING: "test.cfg"
iso.3.6.1.4.1.25506.2.4.1.2.4.1.5.4 = IpAddress: 192.168.1.46
iso.3.6.1.4.1.25506.2.4.1.2.4.1.6.4 = STRING: "ftp"
iso.3.6.1.4.1.25506.2.4.1.2.4.1.7.4 = STRING: "123123123123"
iso.3.6.1.4.1.25506.2.4.1.2.4.1.9.4 = INTEGER: 4
You can use the snmpwalk command to check the execution status of the above configuration operation:
C:\usr\bin> snmpwalk -v 1 -c public 192.168.1.40 1.3.6.1.4.1.25506.2.4.1.2.5.1
The response will be:
iso.3.6.1.4.1.25506.2.4.1.2.5.1.2.1 = INTEGER: 4
iso.3.6.1.4.1.25506.2.4.1.2.5.1.3.1 = INTEGER: 5
iso.3.6.1.4.1.25506.2.4.1.2.5.1.4.1 = INTEGER: 2
iso.3.6.1.4.1.25506.2.4.1.2.5.1.5.1 = Timeticks: (264) 0:00:02.64
iso.3.6.1.4.1.25506.2.4.1.2.5.1.6.1 = Timeticks: (418007) 1:09:40.07
The above displayed information indicates that the net2Startup operation was successful.
You can use the "more" command on the Agent (192.168.1.40) to see that the content of the current configuration file is the same as the content of the test.cfg file. Use the "display startup" command to see that the next startup configuration file is the same as the current configuration file.
(5) Backup the startup configuration file from the device"s Flash to the FTP server (startup2Net).
C:\usr\bin> snmpset -v 1 -c private 192.168.1.40 1.3.6.1.4.1.25506.2.4.1.2.4.1.2.5 i 6 1.3.6.1.4.1.25506.2.4.1.2.4.1.3.5 i 1 1.3.6.1.4.1.25506.2.4.1.2.4.1.4.5 s bb.cfg 1.3.6.1.4.1.25506.2.4.1.2.4.1.5.5 a 192.168.1.46 1.3.6.1.4.1.25506.2.4.1.2.4.1.6.5 s ftp 1.3.6.1.4.1.25506.2.4.1.2.4.1.7.5 s 123123123123 1.3.6.1.4.1.25506.2.4.1.2.4.1.9.5 i 4
The response will be:
iso.3.6.1.4.1.25506.2.4.1.2.4.1.2.5 = INTEGER: 6
iso.3.6.1.4.1.25506.2.4.1.2.4.1.3.5 = INTEGER: 1
iso.3.6.1.4.1.25506.2.4.1.2.4.1.4.5 = STRING: "bb.cfg"
iso.3.6.1.4.1.25506.2.4.1.2.4.1.5.5 = IpAddress: 192.168.1.46
iso.3.6.1.4.1.25506.2.4.1.2.4.1.6.5 = STRING: "ftp"
iso.3.6.1.4.1.25506.2.4.1.2.4.1.7.5 = STRING: "123123123123"
iso.3.6.1.4.1.25506.2.4.1.2.4.1.9.5 = INTEGER: 4
You can use the snmpwalk command to check the execution status of the above configuration operation:
C:\usr\bin> snmpwalk -v 1 -c public 192.168.1.40 1.3.6.1.4.1.25506.2.4.1.2.5.1
The response will be:
iso.3.6.1.4.1.25506.2.4.1.2.5.1.2.1 = INTEGER: 5
iso.3.6.1.4.1.25506.2.4.1.2.5.1.3.1 = INTEGER: 6
iso.3.6.1.4.1.25506.2.4.1.2.5.1.4.1 = INTEGER: 2
iso.3.6.1.4.1.25506.2.4.1.2.5.1.5.1 = Timeticks: (11) 0:00:00.11
iso.3.6.1.4.1.25506.2.4.1.2.5.1.6.1 = Timeticks: (356309) 0:59:23.09
The above displayed information indicates that the startup2Net operation was successful.
You can use the "dir" command on the FTP server (192.168.1.46) to see if the file bb.cfg exists, and then use the "more bb.cfg" command to see if the content of the file is correct, to verify the success of the operation.
Key Configuration
(1) Save the current running configuration to the startup configuration file (running2Startup).
C:\usr\bin> snmpset -v 1 -c private 192.168.1.40 1.3.6.1.4.1.25506.2.4.1.2.4.1.2.1 i 1 1.3.6.1.4.1.25506.2.4.1.2.4.1.9.1 i 4
You can verify the execution of the save operation using the snmpwalk command:
C:\usr\bin> snmpwalk -v 1 -c public 192.168.1.40 1.3.6.1.4.1.25506.2.4.1.2.5.1
(2) Backup the current running configuration to an FTP server (running2Net).
To backup the current configuration to an FTP server (192.168.1.46) using the FTP protocol with the username "ftp" and password "123", and saving the file as "aa.cfg", use the following command:
C:\usr\bin> snmpset -v 1 -c private 192.168.1.40 1.3.6.1.4.1.25506.2.4.1.2.4.1.2.2 i 3 1.3.6.1.4.1.25506.2.4.1.2.4.1.3.2 i 1 1.3.6.1.4.1.25506.2.4.1.2.4.1.4.2 s aa.cfg 1.3.6.1.4.1.25506.2.4.1.2.4.1.5.2 a 192.168.1.46 1.3.6.1.4.1.25506.2.4.1.2.4.1.6.2 s ftp 1.3.6.1.4.1.25506.2.4.1.2.4.1.7.2 s 123123123123 1.3.6.1.4.1.25506.2.4.1.2.4.1.9.2 i 4
You can use the snmpwalk command to check the execution status of the above configuration operation:
C:\usr\bin> snmpwalk -v 1 -c public 192.168.1.40 1.3.6.1.4.1.25506.2.4.1.2.5.1
(3) To restore the configuration file from the FTP server (192.168.1.46) to the device and execute that configuration file (net2Running), use the following command:
C:\usr\bin> snmpset -v 1 -c private 192.168.1.40 1.3.6.1.4.1.25506.2.4.1.2.4.1.2.3 i 4 1.3.6.1.4.1.25506.2.4.1.2.4.1.3.3 i 1 1.3.6.1.4.1.25506.2.4.1.2.4.1.4.3 s test.cfg 1.3.6.1.4.1.25506.2.4.1.2.4.1.5.3 a 192.168.1.46 1.3.6.1.4.1.25506.2.4.1.2.4.1.6.3 s ftp 1.3.6.1.4.1.25506.2.4.1.2.4.1.7.3 s 123123123123 1.3.6.1.4.1.25506.2.4.1.2.4.1.9.3 i 4
(4) Restore the configuration file test.cfg from the FTP server to the device"s Flash memory (net2Startup).
Replace the content of the current configuration file on the Agent with the content of the test.cfg file and specify the current configuration file as the next startup configuration file.
C:\usr\bin> snmpset -v 1 -c private 192.168.1.40 1.3.6.1.4.1.25506.2.4.1.2.4.1.2.4 i 5 1.3.6.1.4.1.25506.2.4.1.2.4.1.3.4 i 1 1.3.6.1.4.1.25506.2.4.1.2.4.1.4.4 s test.cfg 1.3.6.1.4.1.25506.2.4.1.2.4.1.5.4 a 192.168.1.46 1.3.6.1.4.1.25506.2.4.1.2.4.1.6.4 s ftp 1.3.6.1.4.1.25506.2.4.1.2.4.1.7.4 s 123123123123 1.3.6.1.4.1.25506.2.4.1.2.4.1.9.4 i 4
(5) Backup the startup configuration file from the device"s Flash to the FTP server (startup2Net).
C:\usr\bin> snmpset -v 1 -c private 192.168.1.40 1.3.6.1.4.1.25506.2.4.1.2.4.1.2.5 i 6 1.3.6.1.4.1.25506.2.4.1.2.4.1.3.5 i 1 1.3.6.1.4.1.25506.2.4.1.2.4.1.4.5 s bb.cfg 1.3.6.1.4.1.25506.2.4.1.2.4.1.5.5 a 192.168.1.46 1.3.6.1.4.1.25506.2.4.1.2.4.1.6.5 s ftp 1.3.6.1.4.1.25506.2.4.1.2.4.1.7.5 s 123123123123 1.3.6.1.4.1.25506.2.4.1.2.4.1.9.5 i 4